Update 26 February 2010: A comment by a blogger reminded me this post needs updating and I figured the easiest way is to just copy-paste my response here (the original post is still definitely worth reading still): Hey, while I still love statcounter and will continue to use it, although I didn't bother much about Google Analytics because too much data, not too long ago, I have started to use 2 together. One can complement the other actually. Posts re: Google Analytics User Interface and Google Analytics User Interface and Individual post visitor counter.
Original post below. You may also want to read description of statistics provided by Statcounter or Statcounter visitor map and statistics:
There are many free counters - Statcounter, site meter, Google Analytics. I prefer Statcounter as there is a choice of visible and invisible counter and it gives me just the statistics I need. I feel Sitemeter is more for giving nice graphs and Google Analytics gives too much statistics, only invisible counter and I think more for those e-Commerce website and those who use AdWord for advertising.
I will describe how to add Statcounter to your blog. First to to Statcounter and sign up for an account. Sign in and then click "New project" (see screen shot below):

Get the URL of your blog. If you do not know how, refer to what is URL and how to get it and how to get URL of own blog. Copy and paste URL from clipboard into the box for "Website URL". Type the blog title in the first box. Click on the down arrow of "Category" and select a suitable category. Click "Next".

In the next page, click "Configure and Install Code":

After clicking "Configure and Install Code", in the next page, you will have to chose between a visible counter and an invisible counter. We will chose invisible counter because it involves less steps. You may chose a visible counter (first choice) if you want.

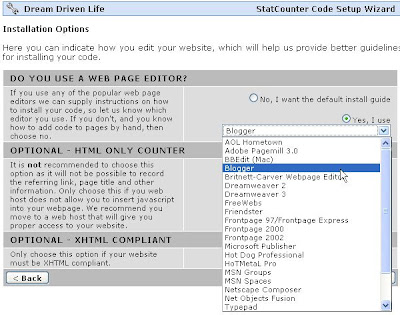
At the bottom, click NEXT. In the next page, tick "Yes I use" and then click the down arrow. Select "Blogger" (see screen shot below):

Click "Next" at the bottom, and the script for the visitor counter will be given in the next page. Click inside the box and the whole script will be highlighted. Press ctrl+C to copy script into clipboard.
Sign into blogger.com to get the Dashboard, and click LAYOUT for the blog you want to install the visitor counter. If you had selected visible counter, you will have to choose where to place the visible counter. In this case, we have chosen invisible counter, so it does not matter where. Click any one of the ADD A PAGE ELEMENT,


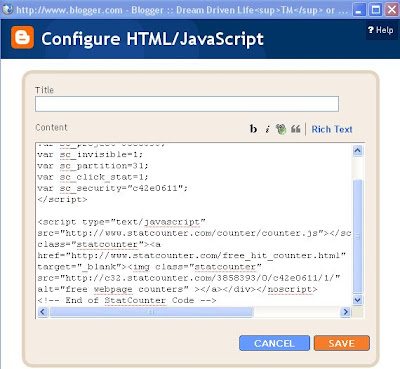
and you will get a pop-up where you will have to choose HTML/Javascript. Click inside the box, press ctrl+V to paste the script from clipboard into the box:

After the visitor counter script is pasted into the box, click SAVE and your visitor counter is successfully installed.


0 comments:
Post a Comment