UPDATE 22 July 2008: The website on which this post is based is no longer active. Please refer to
favicon generator and host for an updated post.
A "favorite icon" or favicon (pronounced fav-eye-con) is a 16x16 pixels icon that appears next to a website's URL in the address bar of a web browser. If you are using a browser that supports tabbed browsing, the favicon will also appear next to the page's title in a tabbed document interface. If you look at the top of this page, at the left hand corner of the address bar, you will see a small graphic of a portion of a fake red-yellow-black "for Dummies" book cover (This has changed to a rare photo of myself laughing). That is the favicon for this blog. If you are using FireFox or Opera, you will also see that icon in the tab. If yours is a personal blog, a good icon will be your personal photo.
Adding a favicon to your blog is a good way to distinguish your blog from the millions of other blogs. To add a favicon, you need to generate a .ico format file, a place to host the file and add 2 link elements in the <head> section of your template. To generate the .ico file and to host it, you can go to
MyFavatar. You need to have ready a roughly square graphic saved to your hard disk.
This was how I added the favicon to this blog. I had a fake "Blogger for Dummies" book cover generated by
Dummies Book Cover Maker 2006. You can see the graphic
here. signgenerator.org can generate other types of sign for you. (If yours is a personal blog, a good graphic to use will be your personal photo). I then use the free Irfanview to crop the bottom-right of the graphic and saved it to the hard disk. I then uploaded it at
MyFavatar which also generated the codes for me to paste into the <head> section of my template.
(for instruction on how to get the script to paste into your blog's template, refer to update below)
Update: I have since changed the favicon to a photo of myself laughing. It was also cropped from a larger photo using Irfanview photoeditor (click "BACK" button to get back to this page).Update: I have discovered that the favicon doesn't appear in Internet Explorer 6. It works for FireFox and Opera.
Further update: It does work with IE7. See the comments.
Update 15 February 2007: A reader complained of difficulties of making this work in New Blogger. I did exactly the same thing as what was described in this post for the New Blogger blog
Testing Blogger Beta (now New Blogger). For the convenience of everyone, I paste below the relevant part of the template from that blog in the scrollbox below:
<head>
<!-- My Favatar -->
<link href='http://favatar.myfavatar.com/blogsmith.ico' rel='shortcut icon' type='image/x-icon'/>
<link href='http://favatar.myfavatar.com/blogsmith.png' rel='icon' type='image/png'/>
<title><data:blog.pageTitle/></title>
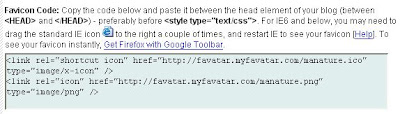
UPDATE: Received a request for help to get the script for the favicon. So what I did was to go through the steps to add a favicon (my mugshot) to
Blogger for Dummies. I list down the steps that I recorded as I generate the script below, with some screenshots to make things clearer:
register
verify email address
sign in
click FAVATAR
click CHOOSE

browse to the image saved in your computer
click SUBMIT
message will say Favatar changed.
Click CODES at the top of the page
under FAVATAR CODE, click EDIT
enter URL
enter Title
choose Category
write Description
click SUBMIT
Message: Blog info successfully updated
click CODES at the top of the page
copy script from Favicon Code
sign into Blogger account
in the Dashboard, click LAYOUT of the blog
click EDIT HTML
look for

tag
paste scrip just below the
tag.
preview and confirm you can see your favicon in the address bar
save template
Books from AmazonThe Rational Guide to Google Blogger (Technical accuracy is assured by Biz Stone, Former Senior Specialist on the Google Blogger Team)Book: Blogging for Dummies
 in the address bar of this webpage above.