Putting images in the sidebar can be dicey. You have to make sure the width of the image fits the width of the sidebar. If it is too wide, it will cause the sidebar to slid to the bottom of the page.
This is how I do it. First, I check the width of the sidebar of my blog. I do this by signing into Dashboard, selecting the blog, clicking the TEMPLATE tab to open the template editor, then I search for this block of codes (click on screenshot to enlarge it):
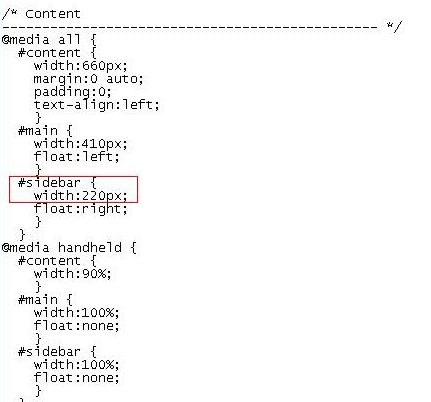
Note the code boxed in red. It says the sidebar is 220 pixels wide. I then have to make sure that whatever images I upload to the sidebar has width less than 220 pixels.
I use the free and very good Irfanview program. I open the image I want to upload with Irfanview. Then in the menu bar, I click Image > Resize/Resample and look for "width" (See screenshot below. Click screenshot to enlarge):

Note that the width of the image is greater than 220 and if you upload this image as it is, it will cause problem with the sidebar. Change the width to something less than 220. For my example, I changed it to 200. Make sure the "Preserve aspect ratio" is checked, otherwise your image will be distorted. Save the image.
Upload the picture to the web. You can either use Blogger or an external photo host like photobucket. If you want to use Blogger, refer to this post: Tip - getting Blogger to host your images for the profile, etc..
Now get back to your template editor. For images to be in the sidebar, the HTML for the image have to be typed between
<!-- Begin #sidebar -->
<div id="sidebar"><div id="sidebar2">
and
</div></div>
<!-- End #sidebar -->
For a guide as to where to paste the HTML, refer to post Blogger template tutorial - adding content via the template
The image HTML that you have to add will be like this:
<img src="URL of photo" alt=""> (It will be good to add a description of your image in between "" in alt="" as if the photo cannot be displayed, the text will be displayed instead, and it will be good for your search engine ranking.) IMPORTANT NOTE: Make sure you are in the INSERT mode when you do this, as otherwise, part of the HTML will be overwritten. It may be a good idea to open Notetab and test if you are in the INSERT mode before you start adding text in the alt="" attribute.
If you want your image to be a link to another site on the web, your HTML will become:
<a href="URL of target site"><img src="URL of photo" alt=""></a>
If you want to see an example of an image added to the sidebar, surf over to Picture Store. The image is at the top of the sidebar and has been made a hyperlink. Try clicking on the image and see what happens.
images with a title
A reader asked in the comments section how to make an image with a title above it. So I am going to post here an image with a title, and the HTML used to display the image. I am using Blogger to host the photos. (See Getting Blogger to host your images. The original photo is 550x370 pixels in size. If uploaded in the manner described in this section, the photo will be too wide as the template says the width of the main column is only 410 pixels wide, and will cause the sidebar to slide down to the bottom of the page in Internet Explorer. Using Irfanview, I resize the photo to 400. I then uploaded the photo to a blog specially created to store images: Citrawarna or Colors of Malaysia. At the post, I click on the photos and that take me to a page with only the image. I copied the URL and then used the URL for the HTML for the image below:
Citrawarna or Colors of Malaysia
The image above is displayed by this HTML:
| <h3>Citrawarna or Colors of Malaysia</h3> <img src="http://photos1.blogger.com/blogger/5611/753/1600/citrawarna%20400%20pixels.jpg" alt="Citrawarna or Colors of Malaysia"> |
Note that this is putting the picture in the post itself, but you will use the same method described above to put it into the sidebar.
Update 4 September 2007: This post is for old classic Blogger template. If you are using the New Blogger template, refer to Put picture in the sidebar and Easy way to add picture to sidebar for New Blogger
| NEWER POST | OLDER POST |


0 comments:
Post a Comment