In earlier posts:
Blogger categories: A simple method
Blogger categories: Simple method
methods to create categories was described. However, a reader has indicated a step-by-step description is needed, so here it is:
1. Create a del.icio.us account (see Introduction to del.icio.us). Even if you already have an existing del.icio.us account, creat another one specially for setting up the categories. For the user name, I would suggest using part of the blog's url or title. For example, the user name I selected for doing the categories for this blog is bloggertricks.
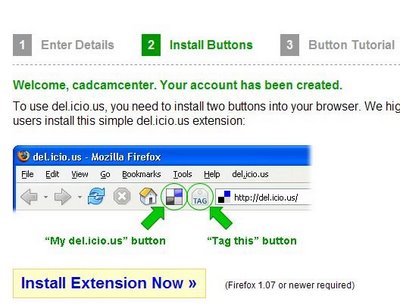
2. If you are using FireFox (highly recommended), install the del.icio.us extension with the "My del.icio.us" and "Tag this" buttons (see screen shot below:

Click the "Install extension now" button and follow the instruction. This will install 2 buttons into the toolbar.
3. Click the "My del.icious"
 button. Confirm that you are logged in. If not, then log in.
4. Surf to the main page (index page) of your blog. At the PREVIOUS POSTS section of the sidebar, click on the very first post. This will take you to the individual post page (permalink) of that post, and the PREVIOUS POSTS will then display the next 10 previous posts. Click the "Tag this"
 button. A pop-up will open with the url, a description, and boxes for you to enter notes and tags. Enter one-word tags for the category you want that post to be in. If the category is more than 1 word, join them with a hyphen or underscore. For example, for my post entitled "Hiding the navbar", since the post is specific to Blogger, I will tag it with "Blogger-specific" (minus the quotes). You can enter more than 1 tag for each post, the tags just have to be separated by a space. Click [save] when you are done.
5. At the PREVIOUS POSTS section in the sidebar, click the next post, which will take you to the individual post page of that post. Click the "Tag this" button again, and tag that post
6. Repeat for the subsequent post until you have tagged all the posts.
Now, you will have to decide which of the methods you want to use - the Easy Method, or the Simple Method. For an example of the Easy Method, surf over to Natural Remedies to see what it is like. The categories created for this blog Blogger Tips and Tricks is an example of the Simple Method. For the Easy Method, go to step 7. If you want the Simple Method, go to step 9.
Easy Method
7. Click the "My del.icio.us" button. At the top right-hand corner of the My del.icio.us homepage, click HELP, then under BLOG INTEGRATION, click TAG ROLLS. Adjust the settings until the appearance of the tag roll you see in the PREVIEW on the right is what you want. I suggest you change the TITLE to Categories or something suitable. For a fuller description of the settings adjustment, refer to the post Blogger categories: Easy method.8. If the appearance of the categories (tag roll) in the preview window on the right is what is desired, click on the code box at the bottom of the page to highlight it, right-click and copy (or ctrl+C). Preferably in another tab or window, sign into Dashboard, select the blog, click the TEMPLATE tab to open the template editor and paste the codes into your template in a suitable place. If you don't know where to paste it, refer to Blogger template tutorial: Adding content via the template. Preview, and if satisfied, save and republish. Done.
Simple Method
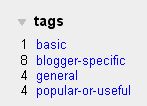
9. Click the "My del.icio.us" button. This will take you to the "homepage" of your del.icio.us account. On the top right corner, you will see the tags you have created. 10. Click on one of the tag (for example, BASIC). This will take you the the del.icio.us page that contains all the links to the posts that was tagged with the category BASIC. Highlight the url in the address bar of that page, right-click and copy. In this example, the url will be http://del.icio.us/bloggertricks/basic.
11. Decide on a suitable place where you want the categories displayed (refer to Blogger template tutorial: Adding content via the template). This will normally be in the sidebar. Open a new window (or tab) and sign into Dashboard, select the blog, click the TEMPLATE tab, and in a suitable place in the template, enter the following code:
<h4>CATEGORIES</h4>
<a href="X">A</a><br />
<a href="Y">B</a><br />
<a href="Z">C</a><br />
12. In the previous window, go back to the My del.icio.us homepage, click on the next tag. In the above example, it will be BLOGGER-SPECIFIC. At that page containing all the links to the posts that are tagged with that category, again copy the url, replace Y with the url, and B with the second category. In the above example, the codes will become
<h2>CATEGORIES</h2>
<a href="http://del.icio.us/bloggertricks/basic">basic</a>
<a href="Y">B</a>
<a href="Z">C</a>
13. Repeat step 12 for the third category
14. If there are more categories, just add more hyperlinks and repeat the steps.
15. When all the categories hyperlinks are done, preview, and if satisfied, save and republish. Done.
Books from Amazon
Publishing a Blog with Blogger: Visual QuickProject Guide
Book: Blogging for Dummies
| NEWER POST | OLDER POST |


0 comments:
Post a Comment