Irfanview photo editor
To take a screenshot of the computer screen, press the "Print Screen" (Print Scrn|Sys Rq) key on your keyboard. This will copy the image into your clipboard. I like to use Irfanview (click BACK button to get back to this page). It is free, lots of features and very good. However, the creator of the program do accept voluntary donations. If you want that, just type or copy-paste "irfanview" into the search box above, tick the WEB radio button and search. You will find lots of sites to download Irfanview.Once you have Irfanview in your program, open the program, click EDIT > PASTE in the menu bar at the top and the screenshot will be pasted into the photo editor window. If you want only a specific section of the screen, click and drag your mouse around the section. The section will be surrounded by a black box. Then click EDIT > CROP SELECTION in the menu bar and the section will be cropped. Then click FILE > SAVE AS.... and save it into a suitable folder in your computer. I normally save this in a folder I named "Temporary".
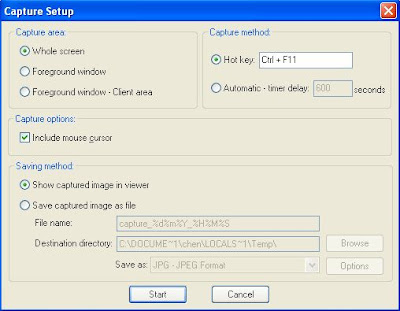
If you want to show the cursor (mouse) in the screenshot, first, make sure you are at the website of which you want the screenshot, then go to Irfanview. Click the "C" key and a screen capture set-up will appear:

At the top left, you will see the hot key for executing the screen capture direct into Irfanview, and by default, it is set to ctrl+F11. I suggest you leave it as it is unless you have used that for some other purposes. You can chose to capture the whole screen or only the foreground. The radio button to include the mouse cursor is ticked by default, and you should leave it as it is if you want to show the mouse cursor in the screen capture. Once everything is set to your satisfaction, click START and you will be taken to the page you were in before. Place your mouse where you want it to show. If there is a drop-down menu, and you want to show the choices, click the down arrow. If what you see is what you want in the screenshot, press simultaneously ctrl+F11 and the screen will appear in the Irfanview photo editor window. You can do whatever you want like crop, insert text, resize the image, etc, and when done, you can save it in a very wide range of file formats, the most popular ones would be .jpg or .gif
Windows Paint
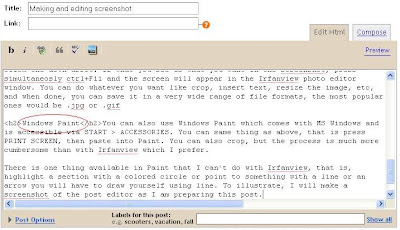
You can also use Windows Paint which comes with MS Windows and is accessible via START > ACCESSORIES. You can same thing as above, that is press PRINT SCREEN, then paste into Paint. You can also crop, but the process is much more cumbersome than with Irfanview which I prefer.There is one thing available in Paint that I can't do with Irfanview, that is, highlight a section with a colored circle or point to something with a line or an arrow you will have to draw yourself using line. To illustrate, I will make a screenshot of the post editor as I am preparing this post.

This screenshot was first done with MS Paint, the color red was selected by clicking on the red square in the color palette at the bottom left:

clicking on the elipse icon in the left sidebar:

then clicking, drag and let go to draw the ellipse around the word "Windows Paint". The file was saved in the .jpg format, reopened in Irfanview, the section I want cropped, saved again and uploaded into this post.


0 comments:
Post a Comment