Blogger Classic
You will first have to upload the picture to the web, either via Blogger (see How to get Blogger to host your picture for the profile, etc. (close new window to get back to this page)) or host it with Photobucket. For a comparison between the two methods, see post Comparison between hosting images with Blogger and Photobucket (click "BACK" button to get back to this page) Update 22 May 2007: Photobucket has been acquired by MySpace which is part of Fox Interactive Media (FIM) for $300 million!!! That means that Photobucket is now backed by another giant. That changed the situations and what has been said above may no longer apply.. Once you have the URL of the picture, you just insert this HTML code into the sidebar:<a href="URL of target site"><img src="URL of picture" alt="" width="" height=""></a>
, making sure that the figure in between quotation marks (width="") of the picture does not exceed the sidebar width (you can leave out the height="" if you want and the image will automatically be rescaled to keep the aspect ratio constant and the image undistorted).Update: You can also upload your photos at Google Page Creator
You may also just resize the picture to fit the sidebar before you upload it, and leave out width="" and height="", and the picture will then display in the actual size. The attribute alt="" is optional, but it is good to include in and type the description of the picture in between the quotation marks. This is because search engines cannot read images, but can read the alt text. For either way, the free Irfanview photo editor will be of great help. See post Using Irfanview photo editor for your blog (click "BACK" button to get back to this page).
Regarding which part of the old classic template to paste it in, this post will be a good guide: Blogger template tutorial: adding content via the template (click "BACK" button ot get back to this page).
Once done, just click SAVE TEMPLATE, then REPUBLISH.
Blogger beta
If you just want a (non-clickable) picture in the sidebar of a Blogger beta template, it is very easy. You just sign into the Dashboard, and in the relevant blog, click LAYOUT, then click "Add a Page Element" in the sidebar. In the pop-up, you then select "Picture" and click "Add to Blog". You can either select the picture from your computer (Browse), or if have the picture already hosted on the Web, type in the URL. You have 2 choices - add the picture in the actual size or resize to fit. If you use the actual size, you will have to ensure the width of picture does not exceed the sidebar. You also have the option of adding a title and a caption. When done, just click "Save changes", and you will see a new page element (widget) titled Picture at the top of the sidebar of the LAYOUT. You can drag it into whatever position you like. However, this method will give you a non-clickable picture.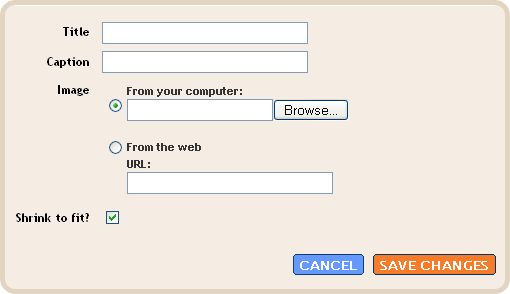
To make a clickable link, I will describe the method by describing how I added a clickble picture in the sidebar of this blog: Star Home Improvements (close new window/tab to return to this page).
I first need to know the width of the sidebar. I am using Ramani's Blogger Beta 3 column template. To get the width, I first get into the template editor (click TEMPLATE > EDIT HTML) and found this block of CSS code:
#sidebar-wrapper {
width: 150px;
float: right;
word-wrap: break-word; /* fix for long text breaking sidebar float in IE */
}
This means that the width of sidebar is 150px, and that is the maximum width (pixels) of the photo I can put in the sidebar without causing the sidebar to slide to the bottom of the page. I first uploaded the picture via a post in Blogger: Malaysia Cameron Highlands Smokehouse (close new window/tab to get back to this page). I click on the picture which will take me to the page on the Web containing the full size of the picture. I copied the URL from the address bar (you can also right-click on the picture and select "copy shortcut" to save the URL to clipboard) and paste it into Notepad for later use. (Update: it has been found that this method doesn't work with the New Blogger anymore. You will have to click on the image to be taken to the page containing just the image, click EDIT > VIEW SOURCE in the menu bar at the top of the page, then get the actual URL of the hosted image from the source code).
I then go to the Dashboard of Star Home Improvements and click on LAYOUT, followed by clicking on "Add a Page Element" on the sidebar. But this time, instead of selecting "Picture", I selected "HTML/Javascript" and click "Add to blog". I then typed the hyperlink tag into the window:
<a href="URL of target site"><img src="URL of picture" alt="" width="150" height="100"></a>
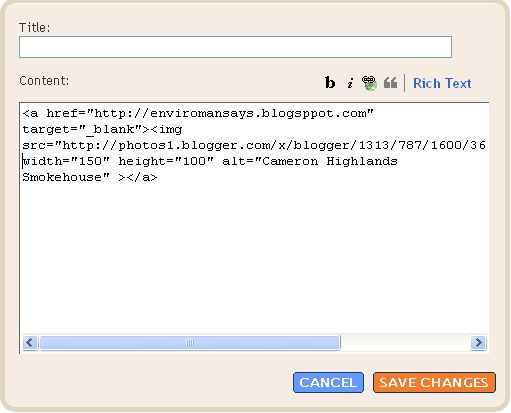
I then click "Save changes" and the clickable image will then be added to the top of the sidebar of the blog Star Home Improvements (close new window/tab to get back to this page). Try clicking on the image and see where it takes you. I hope you do that because our Spaceship Earth needs help.
| NEWER POST | HOME | OLDER POST |


0 comments:
Post a Comment